Tiled map tools with Unity
The arrival of Unity 4.3 brought solid 2D support. Though some issues are being fixed with dot releases and some support is still outstanding, it already provided a solid foundation to prototype (and continue development on) this project. Without giving too much away, one thing that I needed from the outset was an easy way to build tile-base maps quickly, with variable flexibility.
Of course, I began researching existing tools, which are quite mature at this point. One of the favorites is Tiled, and another relative newcomer is Pyxel Edit (which I've been using for design and animation production). Getting Unity to play with Tiled was pretty painless and surprisingly simple. I saved my Tiled maps in .json format, and wrote a simple loader (using SimpleJSON) that would import a map into my project. Here's some example code for the importer:
public void LoadMap(string mapPath)
{
	// read in and parse the .json map file exported from Tiled
	TextAsset mapData = (TextAsset)Resources.Load(mapPath);
	JSONNode json = JSON.Parse(mapData.text);

	// bitmasks defined from the Tiled map format specification
	uint flippedHorizontally = 0x80000000;
	uint flippedVertically = 0x40000000;
	uint flippedDiagonally = 0x20000000;

	int width;
	int height;
	int row;
	int column;
	uint tileID;
	int tileIDOffset;
	float xscale;
	float yscale;

	// for each Tiled layer
	for (int layer = 0; layer < json["layers"].AsArray.Count; layer++)
	{
		// get the width and height of the layer (in tiles)
		width = json["layers"][layer]["width"].AsInt;
		height = json["layers"][layer]["height"].AsInt;

		// for each tile in the layer
		for (int i = 0; i < (width * height); i++)
		{
			// pull the tileID, and use bitmasks to determine any transformations
			tileID = json["layers"][layer]["data"][i].AsUInt;
			xscale = ((tileID & flippedHorizontally) != 0) ? -1.0f : 1.0f;
			yscale = ((tileID & flippedVertically) != 0) ? -1.0f : 1.0f;
			tileID = (tileID & ~(flippedVertically | flippedHorizontally | flippedDiagonally));

			if (tileID != 0)
			{
				// get tile information
				tileIDOffset = json["tilesets"][0]["firstgid"].AsInt;
				row = (int)(i / width);
				column = (int)(i % width);

				// do stuff pertaining to your game with your tileID here
				// ...
			}
		}
	}
}
The issue I had with these (and most other) tilemap editors is that they are based on single tilemap image atlases. This is understandable for their purpose, but it also assumes that during an entire development cycle, your tilemap shouldn't change and is complete from the start. If you have a bunch of maps based on a certain image atlas, the entire system becomes fragile. Unless you are simply adding new sprites, you don't have the option of rearranging tiles, or replacing content, without affecting all maps based on it. Not only that, but Unity Pro supports automatic image atlasing, which means my tilemap image shouldn't have to be pre-determined – I don't need a tilemap atlas. I needed an editor that was based on soft-links to tiles, and in Unity's case, prefabs.
I began exploring the notion of creating my own editor panel, and in just a few days, I had a completely working, flexible prefab-based tile editor that suited my needs perfectly. The nice thing about this is that it is easily extendable to support more features that this specific project requires without finding workarounds using other tools, or being "locked in" to a specific workflow.
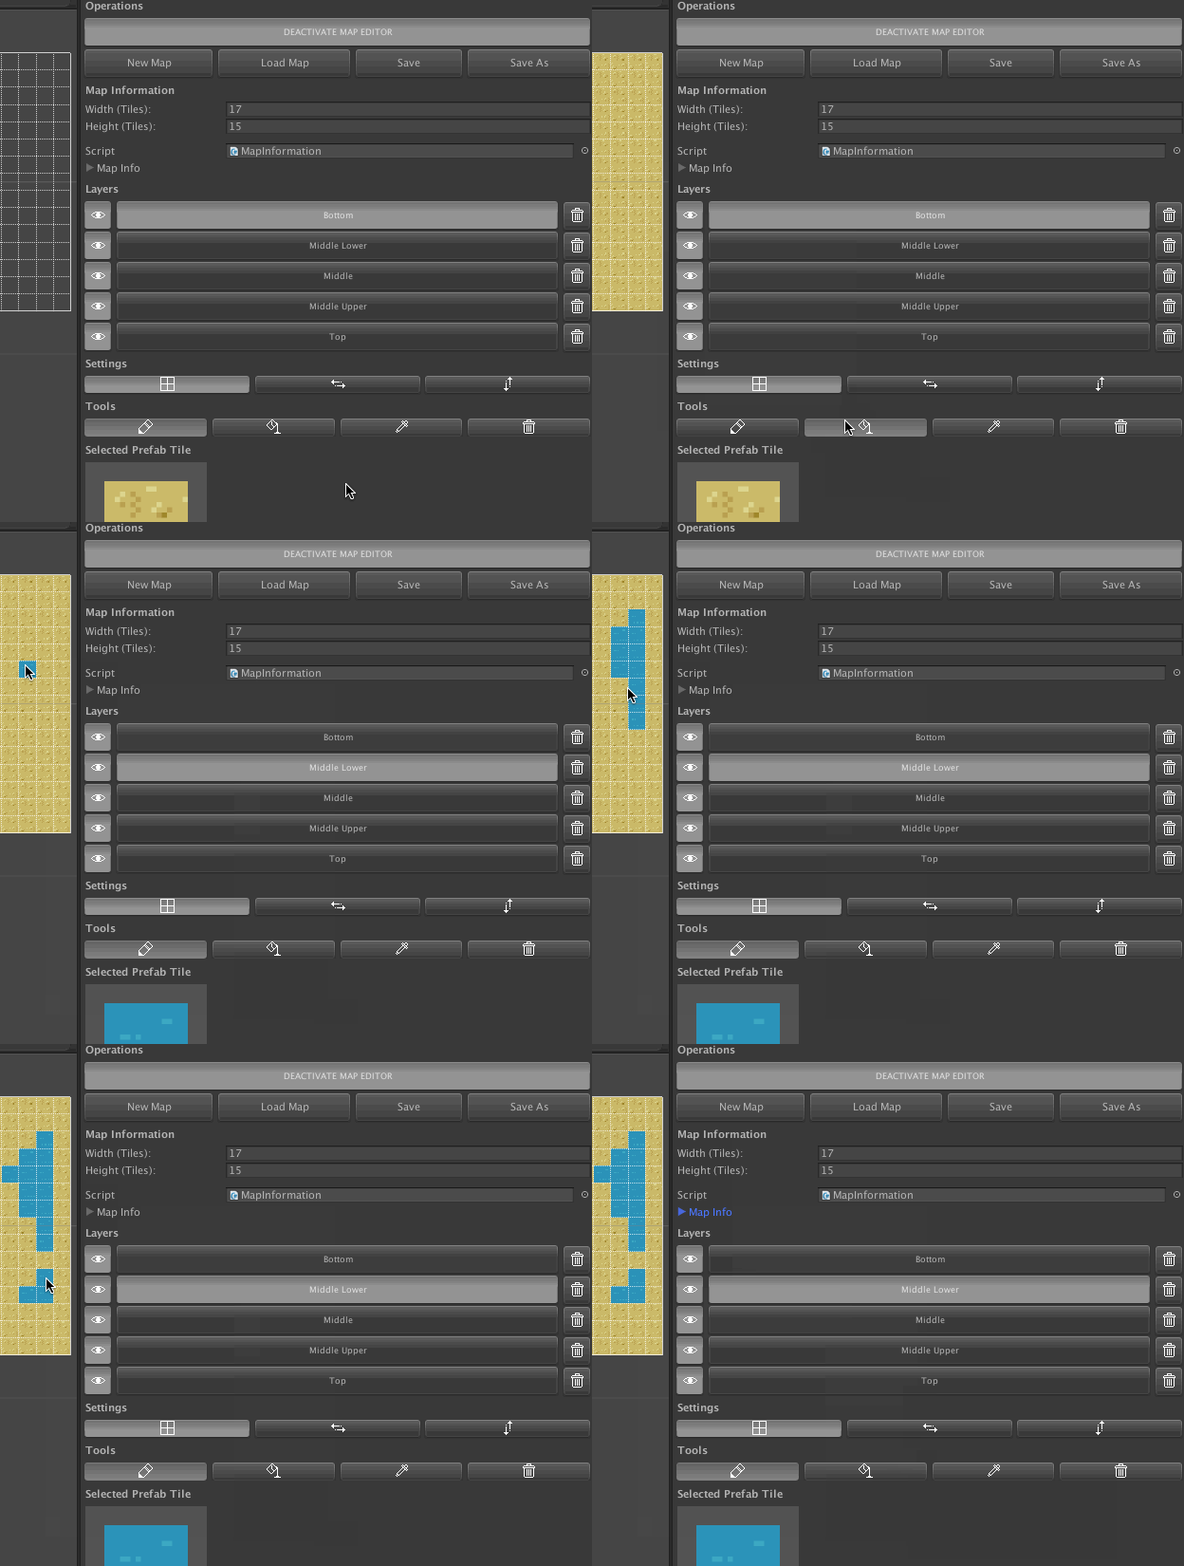
 Custom prefab-based tiled map editor using Editor Window in Unity. I know it's weird that the "Bottom" layer is actually on top. :)
Some research brought me to an excellent tutorial by Daniel Branicki for tuts+ with the basics of creating your own editor window, drawing a grid, and snapping prefabs to the grid. I started my work extending Unity's Editor Window class using this tutorial as a guide, and here are just a few notes that might help you in your tools:
DrawLines()
Rather than use the Gizmos.DrawLine() method, I used Handles.DrawLine() instead. The reason is that Gizmos.DrawLine() seems to be called continuously, slowing down execution, and if you draw transparent lines they quickly stack to create solid lines.
Clean OnGUI()
I like to break out my OnGUI() code into functions based on sections of the UI, for easier editing and maintainability. As an example, you can see how these match up to the UI screenshot above:
void OnGUI()
{
    SectionFileOperations();
    SectionMapInformation();
    SectionLayers();
    SectionSettings();
    SectionTools();
    SectionTiles();
}
Easy Layers
My "layers" are based on Unity's Renderer.sortingOrder. This is just a series of GUILayout.Toggle() controls that map to sortingOrders.
Respond to the Scene
To listen for input and respond to events in the Scene window (in my case to "paint" with prefabs and use keyboard shortcuts to activate tools), you need to add your Editor Window class as a delegate to OnSceneGUI, then implement the OnSceneGUI() function for your custom logic.
void OnFocus()
{
    SceneView.onSceneGUIDelegate -= this.OnSceneGUI;
    SceneView.onSceneGUIDelegate += this.OnSceneGUI;
}

void OnDestroy()
{
    SceneView.onSceneGUIDelegate -= this.OnSceneGUI;
}

void OnSceneGUI(SceneView sceneView)
{
    // custom scene & drawing logic here
}
Snap to Grid
In your Update() function, you can easily snap the selected object to a grid by setting the Selection.transforms position:
private Vector3 Snap(Vector3 point)
{
    Vector3 snappedPoint = new Vector3
    (
        (snapValue * Mathf.Round((point.x / snapValue))),
        (snapValue * Mathf.Round((point.y / snapValue))),
        (snapValue * Mathf.Round((point.z / snapValue)))
    );
    return snappedPoint;
}

void Update()
{
    foreach (Transform transform in Selection.transforms)
    {
	    transform.transform.position = Snap(transform.transform.position);
    }
}

